服务发现——基于Eureka服务器实现微服务注册

在任何分布式架构中,都需要找到机器所在的物理地址,这个过程称为服务发现。

服务发现的优点:

  • 可以快速对环境中运行的服务实例数量进行水平伸缩
  • 将服务的物理位置抽象,由于服务消费者不知道实际服务实例的物理位置,因此可以从可用服务池中添加或移除服务实例
  • 有助于提高应用的弹性。当服务实例不可用时,可从内部可用服务列表移除该实例。
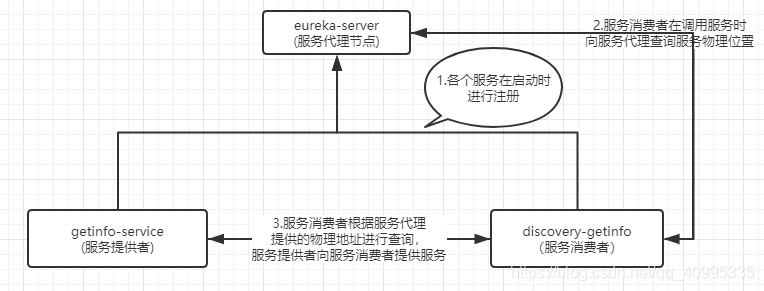
服务发现架构

  1. 微服务通过服务发现代理进行注册
  2. 通过服务发现代理来查找各个微服务实例的物理位置,通常服务消费者也会在本地缓存它请求的服务实例的物理地址
  3. 服务发现节点共享微服务实例的健康信息
  4. 微服务向服务发现代理发送心跳包,如果微服务不可用,则服务发现节点将移除对应实例IP

本文使用Spring Cloud和Netflix的Eureka服务发现引擎来实现服务发现模式。
客户端负载均衡,使用Spring Cloud和Netflix的Ribbon库

本文源码可在此找到:https://github.com/Alexaccele/SpringCloudDemo

本文测试模块介绍

在这里插入图片描述

构建Eureka服务——服务代理

添加maven依赖

除了引入spring cloud以外,主要引入如下依赖,以支持Eureka库

1
2
3
4
<dependency>
<groupId>org.springframework.cloud</groupId>
<artifactId>spring-cloud-starter-netflix-eureka-server</artifactId>
</dependency>

配置文件

1
2
3
4
5
6
7
8
9
server:
port: 8761 #Eureka服务端口

eureka:
client:
registerWithEureka: false #Eureka服务 本身不进行服务注册
fetch-registry: false #Eureka服务 本身不进行本地缓存注册表信息
# server:
# waitTimeInMsWhenSyncEmpty: 5 #等待其他待注册服务5min,让所有服务有机会在通告它们之前通过Eureka进行注册

上面的最后一项属性在这里之所以注释掉,是为了能够快速的启动Eureka服务。

Eureka服务启动类

1
2
3
4
5
6
7
8
9
10
11
12
13
import org.springframework.boot.SpringApplication;
import org.springframework.boot.autoconfigure.SpringBootApplication;
import org.springframework.cloud.netflix.eureka.server.EnableEurekaServer;

@SpringBootApplication
@EnableEurekaServer//启动Eureka服务
public class EurekaServerApplication {

public static void main(String[] args) {
SpringApplication.run(EurekaServerApplication.class, args);
}

}

这里重要的只是@EnableEurekaServer注解,用于在spring服务中启动Eureka服务器。

将服务注册到Eureka服务器

添加maven依赖

1
2
3
4
<dependency>
<groupId>org.springframework.cloud</groupId>
<artifactId>spring-cloud-starter-netflix-eureka-client</artifactId>
</dependency>

引入Eureka库,以便可以用Eureka进行服务注册

配置文件

1
2
3
4
5
6
7
8
9
10
11
12
13
14
15
spring:
application:
name: getinfo-service
profiles:
active: default
eureka:
instance:
prefer-ip-address: true #注册服务的IP,而不是服务器名称
client:
register-with-eureka: true
fetch-registry: true
service-url:
defaultZone: http://localhost:8761/eureka #Eureka服务位置
server:
port: 8090

其中的spring.application.name属性应该写在bootstrap.yml配置文件中,用于确定该服务的应用程序ID,而其余配置则应该写入我们通常所使用的application.yml文件中。

注意当多个服务要部署在本地时,应该注意区别每个服务的端口号应该不能冲突。

此时运行两个应用程序,可以在 http://localhost:8761/eureka/apps 中查看相关注册服务的信息。

使用服务发现来查找服务

使用Spring DiscoveryClient查找服务实例

首先在该应用程序的引导类中加入@EnableDiscoveryClient注解,使应用程序能够使用DiscoveryClient和Ribbon库

1
2
3
4
5
6
7
8
9
10
11
12
13
14
15
16
17
18
@Component
public class InfoDiscoveryClient {
@Autowired
private DiscoveryClient discoveryClient;

public String getInfo(String name){
RestTemplate restTemplate = new RestTemplate();
//获取对应服务的所有实例列表
List<ServiceInstance> instances = discoveryClient.getInstances("getinfo-service");
if(instances.size() == 0)return null;
String serviceUri = String.format("%s/getInfo/%s",
instances.get(0).getUri().toString(),
name);//得到服务实例位置
//使用标准的Spring REST模板类调用该服务实例
ResponseEntity<String> exchange = restTemplate.exchange(serviceUri, HttpMethod.GET, null, String.class, name);
return exchange.getBody();
}
}

使用带有Ribbon功能的Spring RestTemplate调用服务

1
2
3
4
5
6
7
8
9
10
11
12
13
14
15
16
17
18
@Component
public class InfoRibbonClient {
@LoadBalanced
@Bean
private RestTemplate getRestTemplate(){
return new RestTemplate();
}

@Autowired
RestTemplate restTemplate;

public String getInfo(String name){
ResponseEntity<String> exchange = restTemplate.exchange("http://getifo-service/getInfo/{name}",
HttpMethod.GET,
null, String.class, name);
return exchange.getBody();
}
}

如果要将Ribbon和RestTemplate一起使用,必须使用@LoadBalanced注解进行显示标注

调用服务发现

1
2
3
4
5
6
7
8
9
10
11
12
13
14
15
16
17
18
19
20
21
22
23
24
@RestController
public class getInfoController {
@Autowired
InfoDiscoveryClient discoveryClient;
@Autowired
InfoRibbonClient ribbonClient;
@GetMapping("/getInfo/{name}/{type}")
private String getInfoByDiscovery(@PathVariable String name, @PathVariable(name = "type") String discoveryType){
String info = null;
switch (discoveryType){
case "discovery":
System.out.println("use discovery client");
info = discoveryClient.getInfo(name);
break;
case "ribbon":
System.out.println("use ribbon client");
info = ribbonClient.getInfo(name);
break;
default:
info = discoveryClient.getInfo(name);
}
return info;
}
}

服务提供者

一个简单的服务提供者,实现获取相应信息的服务

1
2
3
4
5
6
7
8
9
10
11
12
13
@SpringBootApplication
@RestController
public class GetinfoServiceApplication {

@GetMapping("/getInfo/{name}")
public String getInfo(@PathVariable String name){
return "It's " + name + "'s info: ......";
}
public static void main(String[] args) {
SpringApplication.run(GetinfoServiceApplication.class, args);
}

}

测试

启动服务发现代理之后,再启动服务提供者和服务消费者,并在postman中进行测试,结果如下:
在这里插入图片描述
服务消费者成功的调用了注册在服务代理中的服务。

-------------本文结束感谢您的阅读-------------